
This document will help you to capture all the putty session logs. According to the below steps, this will capture logs for each session dedicated file with IP or host name whatever your providing, as well as date,month,year and time. Like this format (putty,192.168.10.10,06,02,2014,031138).
Some of the key advantage to capture the logs:
1. Most of the time we forgot to take or note down the configuration details / information when we have situation like reboot the server, in that time it will help us.
2. We can refer these logs in future since we are saving in our local disk.
3. If something happen unfortunately / by mistake then we can refer the logs and it will reduce our time to troubleshoot the issue.
4. It will be useful when audit happen.
5. We can refer old configuration details when it is require to check.
6. We can prove, we have not done anything wrong.
7. We can show these logs as evidence , when the situation demands.
Note: Open log file in WordPad which will give you the accurate format.
Topic 1 - Modify Default Settings to capture all putty session screen logs (if you login directly).
Topic 2 - Create new dedicated session (i.e Jumphost or Jombox) coz we use to login all the servers from common gateway server, which is usually call as jumphost/Jombox.
Steps :
Launch Putty Tool. The screen will look like this.
Under Category:
1). Click on Session
2). Select Default Settings and Click Load button

4). Click Browse button


8). Copy paste file name as below format and click Save
- putty,&H,&D,&M,&Y,&T


i.e - Columns “80”, Rows “24”, Lines of Scroll back “20000000”

11). Finally Click Session and select Default Settings and click save

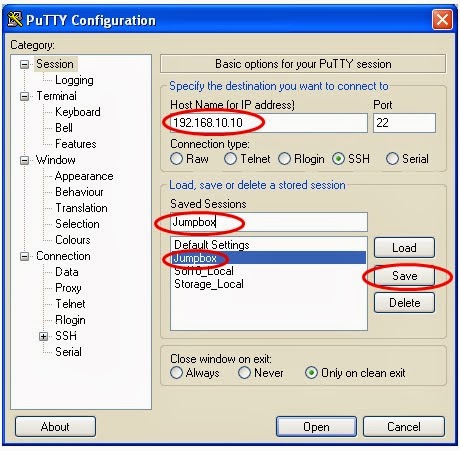
12). Most of the servers we are logging in from jumphost (192.168.101.10) , so create one new dedicated session for jumphost and save it.
Do the all the above steps till no 10 then follow below.
To save dedicated session for jumphost .
I – Provide Host Name (Or IP address)
II – Give Name “Jumpbox” on Saved Session column)
III – Click Save button
13). Click Jumpbox , Press Load button and click Open button or double click Jumpbox.

14). Final result will be like bellow.

15). To disable right click and past option (This is optional but very good practice to avoid mistaken copy past and advantages for remembering all the command)
In Category, select Selection section

Hope this
document will help us!!!
Thanks for reading this post.


This article is very much helpful and i hope this will be an useful information for the needed one. Keep on updating these kinds of informative things...
ReplyDeleteDigital Marketing Training in Chennai
Digital Marketing Course in Chennai
instagram takipçi satın al
ReplyDeleteaşk kitapları
tiktok takipçi satın al
instagram beğeni satın al
youtube abone satın al
twitter takipçi satın al
tiktok beğeni satın al
tiktok izlenme satın al
twitter takipçi satın al
tiktok takipçi satın al
youtube abone satın al
tiktok beğeni satın al
instagram beğeni satın al
trend topic satın al
trend topic satın al
youtube abone satın al
instagram takipçi satın al
beğeni satın al
tiktok izlenme satın al
sms onay
youtube izlenme satın al
tiktok beğeni satın al
sms onay
sms onay
perde modelleri
instagram takipçi satın al
takipçi satın al
tiktok jeton hilesi
instagram takipçi satın al
pubg uc satın al
sultanbet
marsbahis
betboo
betboo
betboo
Perde Modelleri
ReplyDeleteMobil Onay
mobil ödeme bozdurma
nft nasıl alınır
Ankara Evden Eve Nakliyat
Trafik sigortası
DEDEKTOR
web sitesi kurma
aşk kitapları